Get In Touch

Monday, July 29, 2013

Chocolate Banana Milkshake

Thick, frothy, and chocolate with a hint of banana. It's so healthy, you can have it for breakfast. A chocolate milkshake for breakfast? Umm... Yes please! I don't know anyone who would turn that down.


A while back, when I was in preschool, my mom bought this cookbook called Pretend Soup and Other Real Recipes. It really is a great cookbook for younger kids and the recipes are delicious. Almost all of them call for whole, natural ingredients so it's a great way to get kids to start eating healthy at a young age.

Anyways, there's a recipe for a chocolate banana smoothie in it and that's my sister's favorite smoothie. When she has a sore throat or when her braces hurt her really bad that's what she would ask for. And, I have to say, there's a reason she loves it so much.


Even though the recipe is already healthy, it's definitely not vegan and was lacking in protein and fiber for it to be a sufficient breakfast. That problem is easily fixed with yogurt, protein powder, and chia seeds!

The yogurt I used in this recipe I made myself so I'm really not sure how much protein it actually has. But I'm assuming it has more than Greek yogurt because I fermented (is that the right word?) it for 24 hours! Suffice to say, it's really tart. And contains no lactose, so I'm able to eat it.


My family uses Designer Whey protein powder and I'm not to thrilled about using whey, but I'll use it occasionally. It's pretty clean, too, so it's a better option than some of the other protein powders out there.

But whatever you decide to use, the smoothie will be delicious and the perfect chilled breakfast for summer.

 1/2 c. almond milk
1/2 c. Greek yogurt (or other non-dairy yogurt)
1/2-1 scoop protein powder
1/2 frozen banana
1-2 T. cocoa powder
2 T. chia seeds
sweetener to taste
5-6 ice cubes

1. Add all of your ingredients to a blender and give it a whirl.
2. That's it! You're done! Enjoy your delicious chocolate milkshake.


Inquiry of the Day:

Have you found a favorite brand of vegan yogurt or protein powder?

When I couldn't have dairy, I was constantly searching for a good yogurt or protein powder to put in smoothies. A lot of the vegan protein powders out there are really expensive, so I just used chia and flax seeds. The problem with non-dairy yogurt is that it has so many additives and fillers I really don't like to get it that often. Once, I made some coconut milk yogurt, but that was quite a bit of work! So I just gave up my search.  

 
Continue Reading...

Saturday, July 27, 2013

Breakfast Sandwich Without the Bread! AKA The Modified Omelet OR the Eggwich

Most of the time, when you make a breakfast sandwich, there's bread involved. (Well duh.) So what's a girl to do when she wants a breakfast sandwich but can't have bread? I was pondering the question while lying in bed one morning trying to convince myself to get up. I really wanted a breakfast sandwich. The kind with the eggs, bacon or sausage, cheese, and mayonnaise.


When I was younger my mom would make me one an English muffin for breakfast. It was the perfect way to start the school day. Lots of protein from the egg, bacon, and cheese and some whole grains to fill me up.

I wanted to keep all the ingredients of the beloved breakfast sandwich from my childhood without the carbs and gluten, which meant ditching any sort of bread-like item altogether. So the egg became my bread! I've had this for breakfast three times this week, because it's so delicious.


At first I was doubtful the egg would be able to hold up the sausage and cheese, but it worked great. I used ketchup instead of mayonnaise, because, call me crazy, I like ketchup with my eggs. And it sort of works like a glue to keep the sandwich together. But if you don't want to use ketchup salsa, barbecue, sriracha, or mayonnaise are good substitutes.  

I haven't been able to come up with any vegan substitutes, though. Maybe tofu would work? I've heard of people using tofu as a scramble egg replacement, but it might not work for this recipe. The sausage should be easy to replace and you could skip the cheese, but the egg does present a problem. If you figure something out let me know in the comments! 

1 egg
1 sausage patty or 2 slices of bacon
1 slice of cheese
dash of salt and pepper
ketchup or other condiments

1. Cook your sausage first. We buy ours precooked and frozen from Costco, so all I have to do is heat it up in a pan. Transfer your sausage to a plate and cover with a lid.
2. Beat the egg in a small bowl, then, using the same pan you cooked your sausage in, pour into your greased pan. I use a small skillet for this so my egg is the perfect thickness and circular in shape. Sprinkle your salt and pepper on top and let the bottom cook. This takes about 1-2 minutes.
3. Flip your egg and let the other side cook.
4. While your egg is cooking, cut your sausage in half and put the cheese on top of one half. Cover it with the other sausage half and put the lid back over the plate. This should melt the cheese. If not, stick it in the microwave for a few seconds. 
5. For the assembly, just put your sausage on one side of your egg, add your condiments, then fold the other half of the egg on top. Enjoy!


Inquiry of the Day:


What's your favorite breakfast?

Mine changes from time-to-time. A couple weeks ago it was chocolate chia seed pudding. Yum!
Continue Reading...

Wednesday, July 24, 2013

How to Wet-Wash with Watercolors

I'm taking a break from my usual recipe or writing posts today. Instead I thought it'd be fun to share a craft post with you guys. Some of you want start groaning right now and complain that you don't have a creative bone in your bodies, but I can assure you this doesn't require much creativity. As long as you know how to draw and can fling plaint you're fine. ;)

This is the first whitewash project I did
As the summer is winding down, those of you in school (including myself) are probably starting to moan about the approaching school year. But, I bet that you're also bored and running out of things to do with your free time. That's definitely my dilemma. In past years, I've paced around the house and groaned about how bored I was. Not this year! I have a bunch of craft projects I've pinned on Pinterest, I'm working on my novel, and I've started writing fan fiction. I know, I know. More writing. But this is purely recreational. I promise. I'm just writing it during my spare time.

Back to the craft. Whitewashing is pretty simple, though a little time consuming. You just have to wait for it to dry in between painting. I've taken pictures of most of the steps so hopefully that'll make things a little easier. Now onto Step 1.

Step 1:  Gather your materials. You'll need paintbrushes of all sizes, water colors, a bowl of clean water, a paper towel or rag, watercolor paper or heavy duty paper, a pencil, a Sharpie, and your imagination, ;)


Not all of my supplies are there but most of them are

Step 2:  Sketch something onto your piece of paper. You want it to be a relatively simple drawing (like a flower or a peace sign or something) if this is your first time. (I forgot to take a picture of this step, but I'm assuming you all know what drawing looks like ;)

Step 3:  Outline your drawing with the Sharpie. Erase all the leftover pencil marks.


Step 4:  Before doing this next step, make sure you've brushed all the little pieces of eraser off of your picture. Once you've done that, brush water all over your paper until it's soaking wet. You'll know it's wet enough when it sticks to the surface your working on.

You can kinda see that the paper looks slightly darker here

Step 5:  Using your watercolors, pretend like you didn't draw anything on your paper at all and fling watercolors all over it. You don't have to fling them if you don't want to. Just make sure you paint all over it. And don't use the colors black or brown or gray, those won't work for our purposes.


Step 6:  After you're done, carefully pick up your drawing and place it somewhere sunny or in front of a fan for faster drying time.

Step 7:  Once your painting is dry, you can now paint over it like you normally would, then let it dry again. And that's it! You're done! Now you can display your painting in your house or show it to all your family and friends. Or post it on Instagram like I did. ;)   


Inquiry of the Day:


Do you consider yourself crafty or not?


I definitely am. I love to draw, paint, play with clay, make friendship bracelets, etc. I love crafts and think they're a great way to pass the time.


And thank you to my wonderful friend Kelby who taught me how to do this!
Continue Reading...

Monday, July 22, 2013

Recipe Review: Chocolate Covered Strawberry Popsicles

Normally when I do these types of posts I don't call them "recipe reviews" (for example, the chicken nuggets, deep dish cookie pie, vanilla fudgesicles, vegan vanilla ice cream, etc.). But since this recipe was so simple I really didn't change much and it deserved a different title.

Photo taken by Caroline from Chocolate and Carrots

I was scrolling through my Pinterest feed one day when I came across this genius idea: everyone loves chocolate covered strawberries, so why has no one made them into popsicle form?!? Well, no one except Caroline from Chocolate and Carrots. Seriously, the idea is brilliant! Especially because I think I'd like chocolate covered strawberries if it weren't for the seedy texture of the strawberries. That's why I don't eat them plain. And pureeing them gets rid of that problem!

I made them a week or so ago and tried one out the other day as part of my breakfast. The popsicles themselves were very strawberry-y (well duh, Olivia) and tasted like the fruit popsicles from the store, but with much healthier ingredients and they were a little icier. The best part is that the recipe is so simple and takes very little preparation and clean-up. They're also great as a light summer dessert. For those nights when a chocolate craving hits and you want something that won't do much to your waistline.

As for the changes I made, I added some honey to the strawberry puree , because it wasn't quite sweet enough for my tastes. And, instead of using Caroline's recipe for magic shell, I used Chocolate Covered Katie's which worked just as well.

A bonus of trying this recipe? I figured out how to make Dove bars (you know the ice cream bars covered in chocolate?). Yes, you heard me right. No more store bought ice cream bars filled with dairy, unnecessary sugar and calories, and chemicals! I have a plan to make them, but I have yet to try it out. Hopefully I'll get to that this week.


Inquiry of the Day:

Do you like chocolate covered strawberries?

I really haven't met anyone who doesn't like them by choice. What I mean by that is that I know some people can't have chocolate or strawberries. I have a friend who can't have strawberries so she obviously doesn't like them. But other than that, everyone else I know does.

(By the way, sorry for all the links in this post.)
Continue Reading...

Wednesday, July 17, 2013

Vanilla Milkshake

Sorry I haven't posted in so long. I really have no good excuse except for I've been kinda lazy and have no idea what to post.  (If you have any recipes or posts you'd like to see on the blog, please tell me in the comments!)

So, in light of the recent weather, I'm going to post one of my favorite cold drink recipes- a milkshake! It's been super hot here in Indiana and I can barely stand to be outside for more than five minutes with the humidity and whatnot.

Anyways, here's the recipe:
 
Saturday, September 22, 2012

Vanilla Milkshake

I almost killed my Vita-Mix while making this. Apparently, I froze my milk to long. But all is well! Mr. Vita-Mix did not die, which I am very grateful for. If he had I wouldn't be able to make this again.
Frothy and thick


A carton of almond milk was sitting in the fridge just begging to be turned into a milk shake. Me, being as compassionate as I am, willingly obliged. I'm so glad I did. This milkshake is creamy, rich, delicious, and is a snap to make! The longest part is waiting for the milk too freeze.

Would be even better with whipped cream

With only 5 ingredients, I bet you can make this too. Right now.

1 c. almond milk or other non-dairy milk (plus a little extra for blending)
1/4 tsp. lemon juice
1/8 tsp. salt
1/4 tsp. vanilla
1 T. honey or other liquid sweetener

1. Freeze the almond milk for 2-3 hrs. if you want a frothy drink that tastes just as good (but doesn't kill your blender. Freeze for 4-5 hrs. if you want more of a milkshake consistency.
2. After your milk is frozen, add all ingredients to blender.
3. Blend until smooth.
4. Pour into a cup, add chocolate syrup, chocolate chips, whipped cream, or other add-ins and enjoy!

Melts quickly

Substitution Notes: The almond milk can be subbed for any other non-dairy milk. I'm not sure how good regular milk would be. If you try it, please report back in the comments with the results. The honey can be replaced by maple syrup, agave, or any other liquid sweetener. I don't know if table sugar would work. Again, if you try it, please let me know.


Inquiry of the Day: 

What is your favorite kind of milkshake?

My favorite is mint cookies 'n' cream. The only place I've found that it's available is Steak 'n' Shake. Cookie dough and regular mint chip are always good, too. So is chocolate, Reese's, Butterfingers, and- who am I kidding. All of them are pretty darn good!
Continue Reading...

Saturday, July 13, 2013

Frozen Mango Strawberry Lemonade

Summer means lemonade.


And frozen drinks. So why not combine the two? And then add mango and strawberries... Pure perfection.

I actually got the idea for this drink at one of my favorite restaurants ever, Logan's Roadhouse. (If you've never heard of Logan's, it's like a Texas Roadhouse except different. And, in my opinion, tastier!) We were having dinner with some family and I was leafing through one of those little booklets they have at the end of the table (you know, the ones that suck you into buying that delicious looking drink or brownie? ;) when my eye caught on a picture of a tall, frosty glass of frozen lemonade. Of course, I had to try it and it was amazing. But too sweet and not tart enough for my taste. So I decided to make one at my house and adjust it to my preferences.


This drink is especially nice after a hard workout in the sun. That's what I did today. A nice, cold glass of frozen lemonade is the perfect thing to give you a little carb boost, while cooling you down. Let me just say, why do I do boot camp when I know it's so painful? ;) My face was red for about an hour. Eight-five degree weather and boot camp do not go well together.

Oh, and excuse the less-than-amazing pictures. I was too impatient to set up a nice photo shoot. 

little over 1 c. strawberry lemonade (or regular lemonade)
1/2 c. frozen mango
1/2 c. frozen strawberries (if not using strawberry lemonade)
2 T. lemon juice
6-7 ice cubes

1. Add all of the ingredients to your blender and blend until smooth.
2. Pour into a glass and enjoy!


Inquiry of the Day:

Have you ever tried boot camp or cross fit or anything like that?

One of these days, I'm going to try cross fit, but, to quote Aragorn from Lord of the Rings, "It is not this day." ;)

Continue Reading...

Wednesday, July 10, 2013

Chocolate Chip "Brownie" Nut Balls

I must be on a chocolate kick. Heck, when am I not on a chocolate kick? ;)

Lately, I've been trying to wean myself off having sugar almost every night. Normally I don't, but it is summer and when family visits it's kinda hard to avoid. That's why it's time to get back on track!


But going cold turkey doesn't necessarily work for me. I find myself going through with drawl if I don't have some kind of chocolate every now and then. The problem is creating a small healthy chocolate treat that's relatively low in sugar. That's where the nut balls come in!

I love making these little morsels, because they're so customizable and there are so many different flavors out there. This one's based on the chocolate chip brownie Larabar. That's my sister's favorite kind, but it has so much sugar in it! I set out to create one with at least half the amount of sugar as the original Larabar. With less dates, it's easier to taste all the chocolate-y goodness. Yum!


One of the tricky things about making "Larabars" with less dates is that they don't stick together as well. However, I discovered coconut butter and other nut or seed butters do a fantastic job of holding things together. Please, they taste delicious!

In this recipe I used coconut butter and it lends a slightly coconut-y taste, so these nut balls are reminiscent of a chocolate coconut chew Larabar (my personal favorite). If you don't want the coconut taste I'm sure you could sub with more dates. Any way you choose, these chocolate nut balls are a great way to satisfy your chocolate cravings and are great on the go!

1/2 c. dates, chopped
1 c. walnuts
2 T. unsweetened cocoa powder
1 1/2 T. coconut butter
1/4 tsp. vanilla extract
pinch salt
2 T. chocolate chips

1. In a food processor, blitz your dates and nuts into a coarse meal.
2. Add the cocoa powder, coconut butter, vanilla, and salt. Pulse to combine.
3. Stir in the chocolate chips.
4. Form into balls or bars, then freeze for at least 20 minutes. Or, you can eat them right out of the food processor! They're best stored in the refrigerator or freezer, though.


Inquiry of the Day:

What's your favorite Larabar flavor?

I love the chocolate coconut chew, the lemon bar, the blueberry muffin, the carrot cake, the key lime pie, let's face it, the only one I don't like is the banana bread. ;)
Continue Reading...

Sunday, July 7, 2013

Rhubarb Muffins

Another muffin recipe! Yay! ;D As you can probably tell, we like our muffins around here.


Tart, bites of fresh rhubarb surrounded by moist "topping". Sort of like rhubarb crisp for breakfast! Except in muffin form. But equally delicious! I mean, who wouldn't want rhubarb crisp for breakfast? ;)


My mother actually came up with this recipe. She based it off the recipe for cinnamon apple muffins in Elana Amsterdam's cook book, The Gluten Free Almond Flour Cookbook. The recipe worked perfectly! The first time we made them, my mom added an extra quarter cup of sugar, but, it turns out, that made the muffins too sweet. Part of what makes rhubarb good is its unique tartness. Take that away and it just isn't the same.


Oh, guess what? My grandma gave us more rhubarb! But my aunt was in town, so she cooked it down into a sauce and froze it. I can't wait to try some out on ice cream or chia seed pudding. Yum! :) It's a good thing she took charge and did something with it, because I was feeling a little overwhelmed by all of our rhubarb. :/

2 c. almond flour
1/4 tsp. salt
1/2 tsp. baking soda
1/4 c. arrowroot powder
1 tsp. cinnamon
1/4 tsp. nutmeg
1/4 c. coconut oil, melted
1/2 c. honey
1 egg, beaten
1 T. vanilla extract
1 1/2 c. chopped rhubarb
optional: brown sugar for topping

1. Preheat oven to 350 degrees F. Line muffin tin with baking cups or grease well.
2. In a large bowl, combine dry ingredients.
3. Add all of the wet ingredients to the dry and stir well to combine.
4. Fold in rhubarb.
5. Fill each baking cup 3/4 full. Sprinkle brown sugar on top.
6. Bake for 12-15 minutes. When toothpick inserted in the middle comes out clean, they're done.


Inquiry of the Day:

This is in no way related to muffins, but I wanted to know if any of you watched Sherlock (a BBC show). I started the first season a few days ago and finished it tonight. The show is amazing and I highly recommend it. Unfortunately, the third season won't be coming out until early 2014. >:( The good news is we'll be seeing more of Benedict Cumberbatch (Sherlock Holmes) and Martin Freeman (John Watson) in The Hobbit: The Desolation of Smaug. :D If you have Netflix, you can watch the first two seasons on that.

Continue Reading...

Friday, July 5, 2013

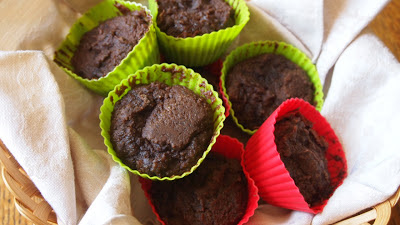
Double Chocolate Banana Muffins

Moist, chocolate-y muffins with a hint of banana. What could be better than that? Well, it does get better. These muffins contain no added sweetener. A little bit of stevia and very ripe bananas are enough to sweeten the whole batch. I was literally taking a leap of faith when I decided to include no sweetener. I was worried they wouldn't be sweet enough for my family, who have a major sweet tooth. Fortunately, my leap of faith went smoothly and the muffins were delicious.


Each muffin packs six grams of protein only eight grams of sugar and a good amount of healthy fats. No need to feel guilty about eating one (or two!).

Bananas truly are a miracle food. They have lots of potassium, some fiber vitamin B6, and cure a number of things, including hangovers, nausea, constipation, and they promote kidney health. Plus, they're incredibly sweet, perfect for baking, snacking, or adding to your breakfast, lunch, or dinner. Grilled bananas with cinnamon and drizzle of maple syrup make a divine dessert. Despite all their good qualities, I'm not really a banana fan. By themselves, their taste is too overpowering and, well, banana-y. But in muffins the chocolate and banana are perfect together.


Even though I don't care for bananas the rest of my family does. We have to buy bananas weekly. My dad takes one to work every day.

We also like to keep a batch of muffins sitting around. They're easy to make and a quick, healthy snack. Besides, who doesn't love chocolate for breakfast?!

2 c. almond flour
1/2 tsp. baking soda
1/4 tsp. salt
3 T. unsweetened cocoa powder
2 bananas, mashed
2 eggs
1/4 c. coconut oil, melted
1/4 tsp. liquid stevia
1/2 c. chocolate chips

1. Preheat oven to 350 degrees F. Grease muffin tin or line with baking cups.
2. In a large bowl, mix together the dry ingredients.
3. In a separate bowl, mash up the banana, beat the eggs with the banana, and add melted coconut oil.  Stir well to combine
4. Add the wet ingredients to the dry and mix together. Then stir in the chocolate chips.
5. Fill each muffin tin 3/4 full.
6. Bake 15-18 minutes or until toothpick inserted in the middle comes out clean.


Inquiry of the Day:

Do you like bananas?

Continue Reading...

Wednesday, July 3, 2013

4th of July Recipe Round-Up

Normally, for a recipe round-up, I'll share some of my own recipes. But lately I've done a lot of recipe round-ups and not enough recipe posting. By this point, you guys are probably seeing some of the same recipes over and over again. I don't want to put you through that kind of torture.

So I thought I'd do something a little different. I will be sharing a few of my own recipes, but a few other bloggers' as well. Their recipes deserve some light, too, because they are amazing!

I know some of you folks don't celebrate the 4th of July, but I'm sure you have some sort of Independence Day wherever you live. Even if it's not anytime soon, why not celebrate summer? Or, depending on where you live, winter? You'll probably come up with some reason to celebrate after seeing these delicious looking recipes. ;)


And a special recipe for my vegan lovelies ;):


Inquiry of the Day:
 
Any special plans for the 4th of July? Or when do you celebrate your country's Independence Day?
 
We have relatives coming in from the east coast and my little sister has everything planned out. Eat out, go to the frozen yogurt place next door, then head out to see some fireworks. She's super excited about it. 

 
Continue Reading...

Followers

Social Media